"Garbage in -> garbage out"
5. Sample preparation and pre-acquisition activities
|
|
"Garbage in -> garbage out" |
NMR sample tubes range from <$1 a piece to >$50. For routine work standard tubes are okay but for high-quality NOE-based spectra at higher fields use high-quality tubes.
Contaminations affecting spectral quality in descending order of severity:
problem: |
what to do: |
| paramagnetic substances e.g. Ni, Mn |
filtration
through Chelex column (filtration through Sep-Pak for carbohydrates; see appendix) |
| solid material ("fish") | filtration through cotton wool or 0.22 mm microfilter |
| high salt content | filtration through Sep-Pak for carbohydrates (see appendix) |
| precipitate of dissolved compound |
filtration through
cotton wool or microfilter change solvent |
NMR Sample Preparation [1]
(for a PDF version of this document
click here)
To obtain high resolution NMR spectra it is necessary that your
NMR sample is free of suspended material (precipitates, dust, etc.).
Suspended material present in solution will increase the line width of the
spectrum; broad spectral lines reduce spectral resolution and no amount of
shimming can correct for this. Suspended material can
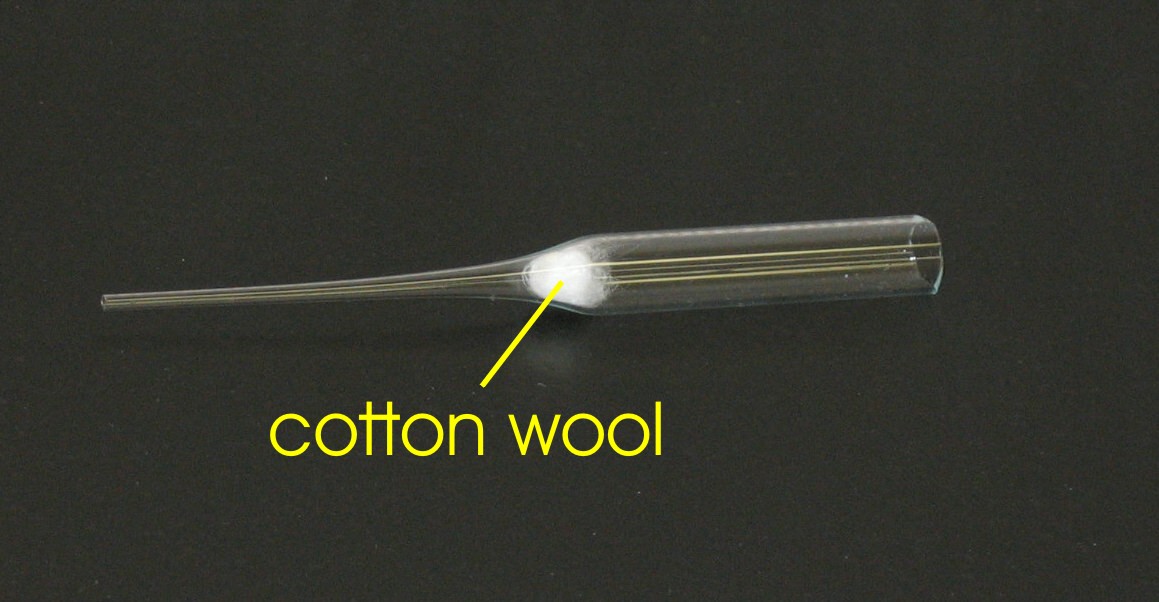
easily be removed from an NMR sample by constructing a filter using cotton wool
as a filtering agent [2]. Conversely, glass wool is a
very poor filtering agent since glass wool does not filter out small particles,
whereas cotton wool tends to filter out the smallest of particles. A filter can
be made by placing a small amount of cotton wool inside a Pasteur pipette as
shown in Figure
5.1a.
|
|
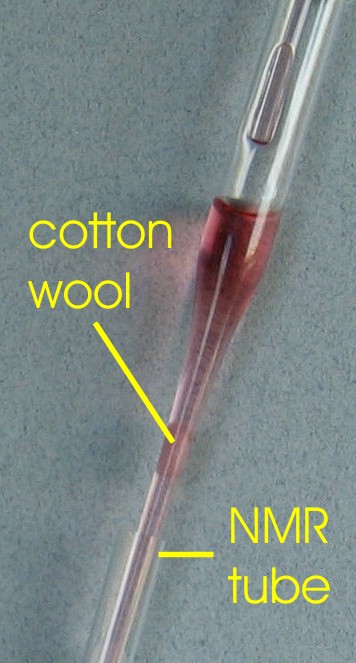
Note that the Pasteur pipette has been cut to facilitate handling of the cotton wool. Alternatively, the cotton wool can also be pushed down an uncut long [3] pipette with the help of a second pipette (this method was used in Figure 2 to position the cotton). The solute of interest can then be dissolved in a separate glass vial using less than the final volume of deuterated solvent (e.g. CDCl3, DMSO-D8, CD3OD, etc.) required to make your NMR sample. After the solute has been dissolved it can be transferred directly to a NMR tube by passing the solution through the cotton filter as shown in Figure 5.1b.
|
|
|
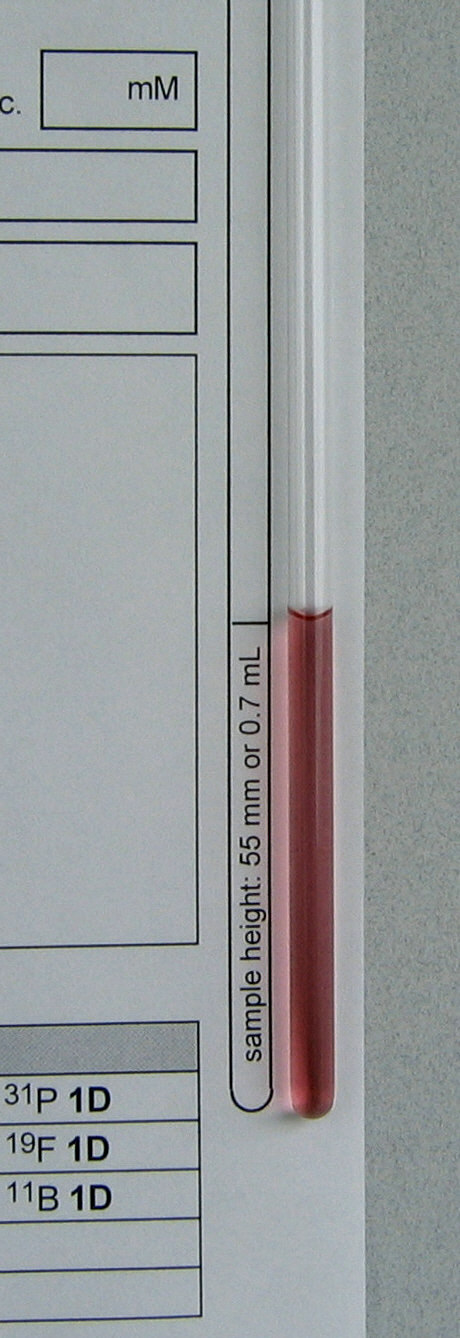
Finally, the sample volume can be adjusted by adding the remaining solvent to the NMR tube so that a final sample volume of ~700 mL or a sample height of ~55 mm is reached (Figure 5.1c), followed by vigorous shaking of the sample to effectively mix its content. The suggested sample volume for our instruments is 700 mL. Trying to concentrate your sample by reducing the sample volume is not recommended. A short sample (i.e. volume less than 500 mL) can only be shimmed through tremendous effort and this time can be much better spent acquiring your data.
References
[1] Adapted from the Chem 241/341 sample preparation guide by Dr. Jason Cooke, whose students consistently submit some of the best NMR samples seen by the NMR Service Lab.
[2]
Medical cotton is reported to be free of compounds that can be extracted by
organic solvents (A.E. Derome, Modern NMR Techniques for Chemistry Research,
Pergamon Press, 1987).
[3]
9” pipettes are sufficient (no need to buy the much more expensive 10.5” type).
5.2. Sample volume and sample concentration
Correct sample volume is critical for good results.
|
|
The time required for shimming (5.7.4) increases dramatically with incorrect volume (especially when sample volume is too low) |
|
|
Too low sample volume can make it impossible to obtain high quality spectra |
|
|
Too high sample volume unnecessarily dilutes sample |
Experimental time to obtain a certain
signal-to-noise ratio is |
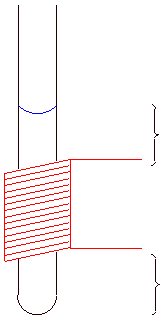 |
Varian probes are 0.7 mL probes, hence the concentration of the sample in mM is given by:
Ideal sample height is indicated by the red bar
Not that if done correctly, the
liquid/gas and liquid/solid interfaces are at an equal distance from the
transmitter/receiver coil.
Figure 5.2: NMR tube and sample volume |
 |
All parameter sets used by AO menu buttons are automatically referenced as shown below (strictly speaking, only valid at 27.0° C):
1H (number of lines) |
13C (number of lines) |
|
| 7.24 ppm (1) | 77.0 ppm (3) | |
| 7.15 ppm (1) | 128.0 ppm (3) | |
| 5.32 ppm (3) | 53.8 ppm (5) | |
| 3.30 ppm (5) | 49.0 ppm (7) | |
| 2.49 ppm (5) | 39.5 ppm (7) | |
0.1%
ext. acetone @ |
1%
ext. acetone @ |
|
| Ac-D6 | 2.04 ppm (5) | 29.8 ppm (7) |
1H and
13C spectra of all 7 solvents (incl. common impurities) can be found here.Referencing to external acetone puts HDO at 4.75 ppm (27.0°C). The HDO chemical shift changes
+/- 0.008 ppm for every - / + 1.0°C (note signs!).If changes are made by the user, correct referencing can be restored by using the menus: 1:AO -> 2:Proc -> 7:AdjRef whereby the referencing is restored in all supported solvents and experiments, 1D or 2D, homo- or heteronuclear.
Alternatively, if different referencing is desired and in unsupported solvents, the menu 1:AO -> 2:Proc -> 6:RefLine allows placement of the cursor on one spectral line and entering the desired value in ppm (1D and 2D).
5.4 Access to spectrometers (reservations etc.)
Access is, in general, restricted to members of the following work groups: Bundle, Lowary, Vederas. Furthermore, a new user has to be approved, after a training session, by the NMR supervisor (Dr. Albin Otter, E3-51A).
i300, i400, m400, s400, ibd5, u500
General access via the on-line reservation system. The booking rules change periodically and are therefore summarized in separate documents: i300, i400, m400, s400, ibd5, u500.
UNIX and LINUX computers are multi-user machines and protect data for each user with a password. Using the correct user name is critical for the correct functioning of the systems. Under normal conditions (i.e. the previous user logged out correctly!) the information below is present on the monitor:
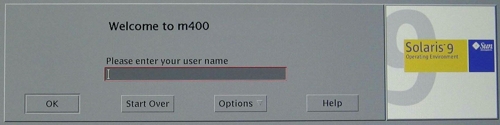 After entering a valid username:
|
These case sensitive user names are accepted (ch461 not on all systems):
description |
password |
data time "axe" |
|
drbnmr |
Bundle group account |
Y |
N |
| clivenmr | Clive group account |
Y |
N |
| mcnmr | Cowie group account |
Y |
N |
| gennmr | General users account |
Y |
180 days |
| hallnmr | Hall group account |
Y |
N |
| tllnmr | Lowary group account |
Y |
N |
ibdnmr |
NINT (Buriak, Fenniri) | Y |
N |
| jmsnmr | Stryker group account |
Y |
N |
tyknmr |
Tykwinski group account |
Y |
N |
jcvnmr |
Vederas group account |
Y |
N |
| westnmr |
West group account |
Y |
N |
| ch461 | Chemistry 461 |
Y |
120 days |
|
|
Do not tinker with the Options button: changes made there affect every other user after you, i.e. you could become quickly very unpopular…. |
If the previous user forgot to log out type whoami or vnmruser in the VNMR input window. The system will tell you the current user name.
If the user name is wrong by all means log out and then log in with the correct user name. |
Reasons:
The entire NMR system has over 2000 Gbyte (2 Terabyte!) of disk space. Therefore, if you put your data in the wrong place:|
|
a search of immense proportions for the data can result, especially if you don’t remember the case sensitive (!) file name exactly as written, requiring orders of magnitude more time than a quick log out/log in procedure |
|
|
the ownership of the file(s), if ever found, is wrong and requires intervention by the system administrator to allow you to do anything with the file(s) |
|
|
some macros and menu buttons act differently depending on the user name |
Using the correct user name prevents writing the data in the wrong place and automatically provides the correct ownership.
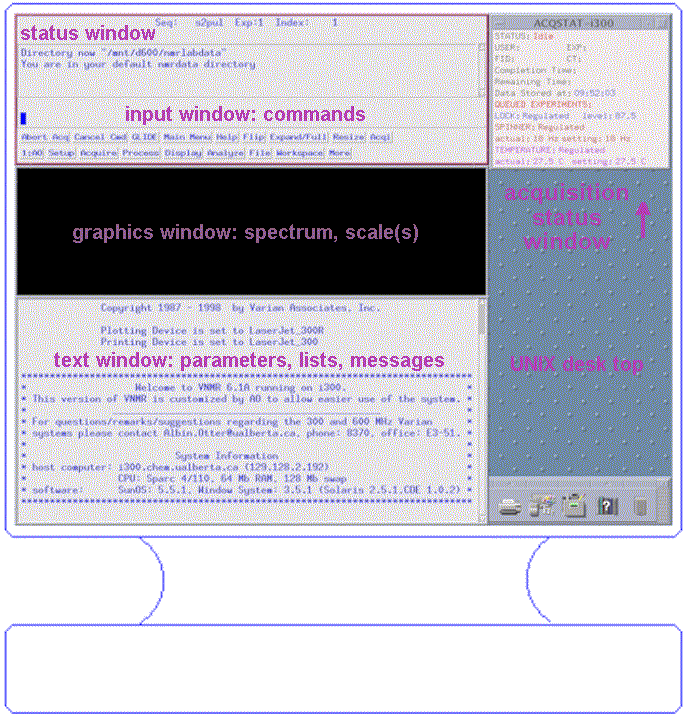
After the login process start VNMR by clicking on the icon shown below :

This results in the interface shown in the next Figure:
|
|
There are two fundamentally different ways to operate VNMR:
|
|
entering parameters, commands and macros with the keyboard |
|
|
left-clicking menu buttons with the mouse thereby choosing predefined parameter sets and execute macros |
All UNIX mice are of the 3-button type. In UNIX and in VNMR the functions of the mouse buttons are somewhat different hence some trial and error cannot be completely avoided.
5.7 Locking, shimming and tuning
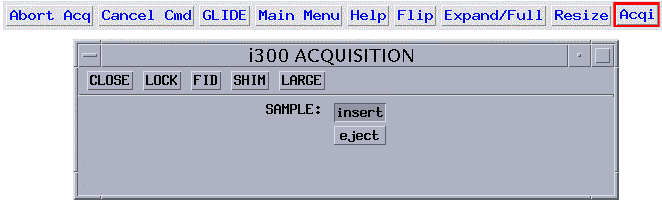
Connect to the Acquisition Window shown below by clicking on the Acqi button in the top menu row:
|
|
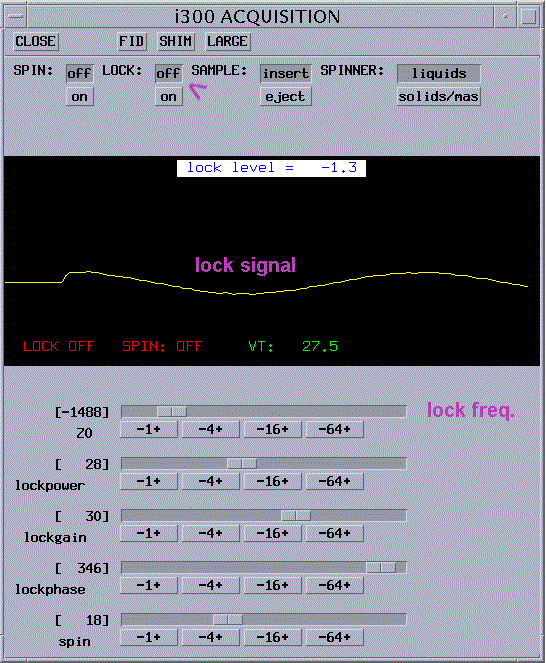
Click on the LOCK button to open the LOCK window as shown below:
|
|
|
|
if on, turn LOCK off |
|
|
if on, turn SPIN off |
|
|
click on the eject button |
If a sample is in the magnet it will float on an air cushion to the top of the magnet. Push your sample correctly into the spinner (see 5.2; use depth gauge or depth gauge drawing on the console door).
|
|
For movie click on picture (under development). |
Close the Acquisition Window.
In a multi user environment it is not known what shim values were left behind by the last user
and locking can be difficult if shims are totally off. Therefore, after lowering your sample into the magnet, load suitable shims for the solvent of your sample:|
|
click on Main Menu then 1:AO -> 6:Shims |
|
|
go to either your own (F1) or the standard shim directory (F2) |
|
|
choose a suitable shim set by clicking on its name |
|
|
load with 4:Load Sh; shims are sent automatically to the magnet's shim system |
|
Figure 5.8:
Loading shims |
|
|
the system automatically returns to the AO Menu and and the nmrdata directory |
Open the Acquisition Window (Acqi button):
|
|
change Z0 until you observe the lock signal as a wavy line; you can type z0 and the solvent-dependent, estimated values will appear on the screen |
|
|
if necessary increase lock gain and lock power |
|
|
change Z0 until you are on resonance: lock signal becomes flat (type z0 to display values for all supported solvents) |
|
|
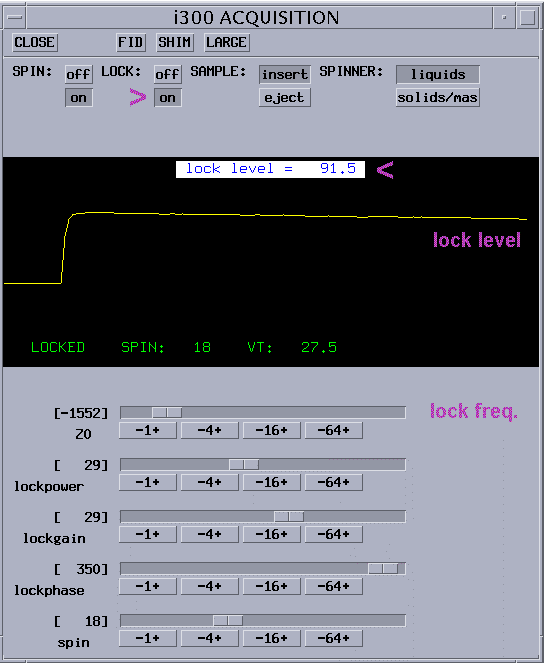
turn LOCK on and wait a few seconds |
|
|
lock signal should look like in the picture below |
|
|
|
|
adjust lock phase to maximize lock reading |
If not successful turn LOCK off and continue to search for the Z0 frequency.
Once locked, avoid high lock power which causes
saturation, i.e. more power flows into the sample than can be dissipated through relaxation
processes resulting in sample heating and poor quality spectra.
Lock level should be between 80 and 100 otherwise lock might be lost under the effect of gradients (but not over 100). |
Why Locking? Every magnet slowly drifts (field drift) to lower field strength, typically 1 to 5 Hz/hour. To achieve frequency stability over the duration of an experiment (16 hours or more for some 2D, days for 3D, 4D, 5D!), FT spectrometers use the deuterium signal of the solvent as an internal lock. Stability is achieved through comparison of the spectrometer frequency with the lock signal frequency.
The amount of D is quite different in, for example, D2O, CD3OD and CDCl3. Therefore, lock power and lock gain are very solvent/spectrometer-dependent (use z0 macro).
CD3OD has two deuterium signals. Locking on OD is difficult, therefore locking on CD3 is recommended, "much more likely to happen" and assumed throughout these notes. If locked on OD (quite hard to do!), the spectral window and referencing will be off by ca. 1.5 ppm.
Locking can be carried out by the spectrometer automatically. However, even a modestly experienced operator is much faster than the automation routine.
No tuning on m400; u500 gas ProTune. |
Parameter sets are based on a properly tuned probe. Failure to tune the probe correctly can result in partial or complete loss of NMR signals in some 2D experiments and APT. For 1D proton spectra tuning is usually not necessary. The tuning depends on:
|
|
solvent, sample volume, salt content, NMR tube |
|
|
NMR probe |
When tuning is desired or
necessary click on
1:AO ®
5:Setup4Tuning
which ensures that the
spectrometer is set up correctly and ready for tuning.
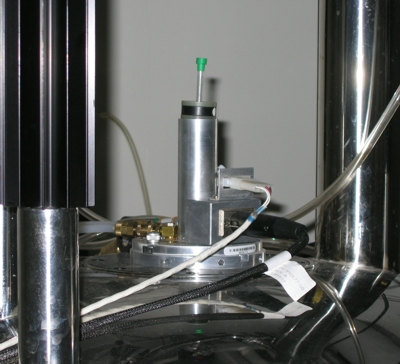
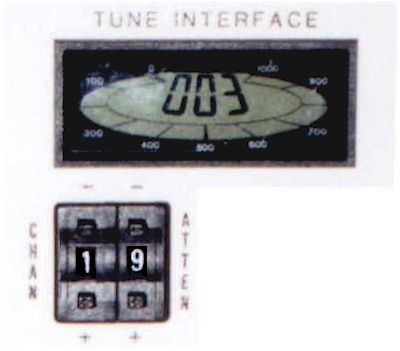
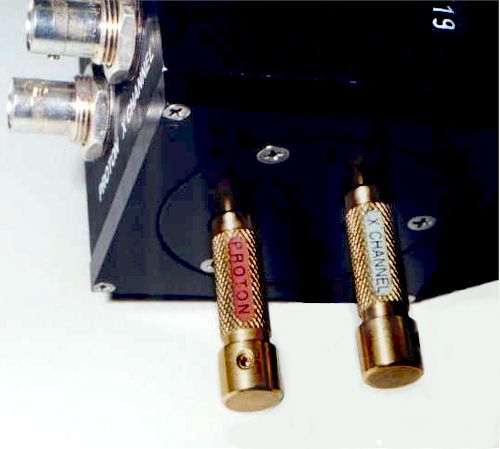
Correct tuning is achieved by minimizing the reading of the reflection meter next to the magnet. Shown here is the i300 probe. The tuning information for the asw400 probe, in use on the i400 spectrometer, is shown here.
 |
 |
||||||||||
|
|
The tuning procedure is spectrometer-specific. Don’t forget to return the cable(s) to their original connections when done! (see color-coded labels on cables).
Tuning can be automated but only u500 has the required hardware.
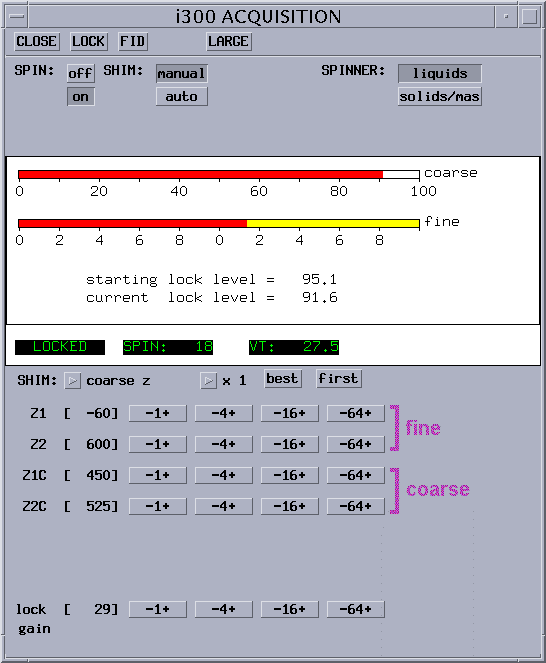
Purpose: optimize the homogeneity of the magnetic field by using shim gradients: Z
1(linear), Z2 (squared), X, Y and many more.(a) Use gradient shimming (easiest)
by clicking on the following buttons:and wait until complete, then
turn spinner on (m400 and u500 only, automatic on other spectrometers).
If you prefer, or if gradient shimming fails,
use
(b) Manual
shimming as described below:
|
|
|
|
change Z1C to obtain maximum lock level (horizontal bars) |
|
|
change Z2C to achieve the same, then return to Z1C |
|
|
repeat until no improvement can be achieved anymore |
|
|
if shim changes are large, re-optimize lock phase (as discussed before in 5.7.2) |
|
|
disconnect from the Acquisition Window |